ORNA LEGENDS
  • Home
  • Guides
  • Builds
  • Aethric
    • Aethric Map
  • Amities
  • More
    • Codex >
      • Tier 1
      • Tier 2
      • Tier 3
      • Tier 4
      • Tier 5
      • Tier 6
      • Tier 7
      • Tier 8
      • Tier 9
      • Tier 10
    • Podcast

strategy - Builds - Guides

Dominate your world

How to Endless for Massive Exp and Orns as Realmshifter - by Signet and Knight411

24/2/2023

2 Comments


Introduction

Realmshifter default sprite
​Before going too far down this abyss, we strongly recommend you reading our starter guide (here) if you’re a fresh Realm. For the purposes of this guide, we are going to assume you satisfy the following conditions:
  • Decently geared as a Realmshifter, don’t need best-in-slot equipment but you’ve been gearing for a while to have working knowledge of commonly used items at T10
  • Unlocked all classes, and therefore we won’t be covering where to get skills in this guide
  • Understand the basics of Endless and why you’d want to do it, and therefore we’re not going to discuss if Endless is better than Hard Boss, for example

To make this easy to understand, we’ll be covering all the different pieces of Endless chronologically rather than by topic. The reason for this is because Endless, unlike other content, requires quite a few different moving pieces in order for you to maximize gains. Don’t worry if you can’t make the stars align for every run, think of this as the ideal blueprint. With that, let’s get into it.

​When to do Endless?

What? Not gear? Not spec? Which day? Yes. Maximizing gains in Endless means stacking as many boosting buffs as possible while you do it. Which day matters for the simple reason that every month specific days are set aside as events. The days we care about are:
  • Orn boosting: Orn event and Spelunking Event
  • Experience boosting: Exp event

Jamming your Orn runs while Orn boosting events are happening and Exp runs while Exp events are happening gets you what you want much more efficiently. Many Kingdoms also run temples during Orn/Exp events, all the more reason to pack it in during this time.

​Where to do Endless?

​So you’ve taken off work (or called in “sick”) during Orn/Exp events and you’re ready to smash some Endless Dungeons, next question is: what’s the best location? From experience, 3-4 dungeons “prepped” (more on this later) together is the optimal number. If you’re in your Origin Town, you have a minimum of two (Personal Gauntlet and Castle Dungeon), this means you need another one or two in addition. Less experienced / geared players will want 4, whereas more experienced / geared players will want 3. The forcing function here is actually how many dungeons you can fit into the length of one shrine (60 minutes) and the longer your runs take due to experience/gear, the fewer dungeons you can fit into the time of one shrine.

If you have only 2 dungeons, consider an alt location with 3-4 along with an Outpost so you can swap pets easily for the run. Obviously you can do it with just 2, but 3-4 maximizes the impact of your shrine.

​Phase 1: Preparation

OK so it’s an event day, your kingdom has popped temples, you have a spot with 3-4 dungeons as well as a way to change pets (Castle / Outpost). The first thing you’ll be doing is prepping all dungeons you’ll run in parallel rather than in sequence. This means if you have 3 tasks and 3 dungeons, you want to do task 1 in dungeons A, B, and C, before you do task 2 in dungeons A, B, and C (rather than finish tasks 1, 2, and 3 in dungeon A before going to B). The reason for this is because there’s a cost to each task in either orns (swapping specializations) or effort (swapping pets) and we want to quickly finish each task across all dungeons before moving on to the next.

Action sequence:
  • Beowulf class (reason is you want Brynhild to stick)
  • Raider specialization (reason is you want berserk later on)
  • Check World loadout to adjust for dungeon cooldown (e.g. 2 x Concords will mean your personal gauntlet expiring within 60 minutes, so adjust accordingly if you need more time to finish an Endless run)
  • Swap to ideally Steward Golem or Fey Yeti as a pet. Orichalcum Golem if you have neither of those.
  • Swap to full immunity / buffing gear on Beowulf
Beowulf endless buffing gear
Beowulf endless buffing skills
  • Start dungeon 1
  • Buff up with the following: Ward of Ortanite (prevents early damage), Golem’s Fortitude, Barrier II, Mimic’s Mischief, Wyvern Speed II (make sure you get both Atk Up and Dex Up), Wyrm’s Song, and Call of Byrnhild (should be easy since you’re Beo), Divine Bastion 2
  • Do not leave the dungeon unless these 2 things are true:
  • Dragon Alignment has been applied from offhand book
  • You have elemental wards up from Golem (Realms are immune to Dark/Holy so don’t need to worry about those)
  • You can use a cheap do-nothing skill or just Defend from the book while you wait.
  • Once complete, keep the exact same setup and rinse and repeat for dungeons 2, 3, and so on
  • Next, swap to Realmshifter
  • Grab Chimera / Fey Chimera(*)
  • Swap to full immunity / buffing gear on Realmshifter
  • Go back into Dungeon 1
  • Cast Berserk 3
  • Eat a Berserk Mushroom(*)
  • Spam Ward of Ortanite until Chimera asks Berserk 1(*)
  • Do not leave the dungeon unless you have all 3 Berserks active
  • Once complete, keep the same exact setup and rinse and repeat for dungeons 2, 3, and so on
(*These three steps can be replaced with swapping to Berserker if you’d rather spend 25k orns than spend 3-4 berserk mushrooms. Swap and use both Berserk I and Berserk II rather than eat the mushroom.)
  • Congratulations, at this point you’ve finished prepping the dungeons and are ready to kill some monsters. Please note the following:
  • Shrines are NOT active at this time. Do not use a shrine yet.
  • Gunnr is NOT recommended. Use at your own risk.
  • You can technically achieve all the steps without swapping pets (e.g. using Chimera weapon for buff or getting elemental wards one by one via Ward of Annwn/Balor), it can just be more tedious. This is very useful to do though if you’re in someone else’s wayvessel.

​Phase 2: Floors 1 through 100

​A few important things to note here before you start:
  1. Do not use shrine just yet as it’s better to save the full shrine for floors F100-250 tightly packed together than to have a shrine active on F1-100 but run out later. If you’re rich or have access to more shrines than you can use, by all means go ahead starting at the first floor.
  2. The main purpose of F1-100 is to zip through as quickly as possible while building up ward turns for later. This means Guarding Strikes III will be your best friend as it has enough pen to go through any zerk mobs you’ll see and also add ward turns insanely quickly. If you have a good Arisen Hel’s Feathers you can also use Volley III here to completely ignore mana. Just don’t get too complacent, you can still die to something like a zerk Fallen Beo if you’re not paying attention.
  3. F100 is a rough checkpoint for this phase, you can certainly push to F150 before the next phase if you so choose

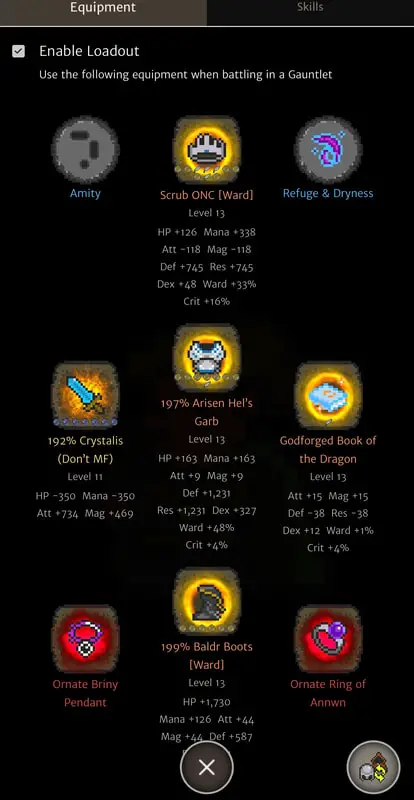
Specialization for this phase: Oracle. Reason being you’re likely not using and shrine and you don’t need to sleep dart anything just yet, may as well milk the most Orn / Exp you can with 2x Accessory Effectiveness amities.

​Gear Choice
For orns and exp respectively:
Realm endless gear orns
Realm endless gear exp
Notes on gear choice:
  • Please don’t mix and match (and use Arisen Tomes for EXP while still having CJO on for Orns). It’s in your best interest to focus on either Orns or EXP and gear accordingly. Because of how multipliers work in this game, min maxing is the best strategy vs. taking the middle road and missing out on huge gains.
  • Personally, I find going for a max crit build with basic attack to be most effective. The reason is in later floors there’s just no way to penetrate a zerk mob with anything else and those are where the juicy gains are (10B+ experience or 1M+ orns). So while it seems like I’m stacking too much crit for Sortie or Realmstrikes, keep Basic Attack in mind as your most commonly used attack after F200.
  • The biggest difference between Orn runs and Exp runs are the armor and the accessories. Orn runs will use CJO whereas Exp runs will use a real beefy armor (as CJO does not provide any boosts for Exp), and Orn runs will use BoG whereas Exp runs will use Arisen Monster Tomes.
  • You will generally go 50-100 floors further in Exp runs than Orn runs due to the beefy chest armor so mentally adjust your checkpoint accordingly

Action sequence:
  • Grab Phoenix pet
  • Blast mobs with Guarding Strikes III
  • Use Earthstrike III or Lightningstrike III for Dragon immune monsters, over time you’ll have a good sense of when to use which skill
  • Don’t worry too much about redlining or bloodshift, just get through these floors as quickly as you can
  • Once you’ve hit Floor 100 (or 150, or whatever checkpoint you set for yourself because the mobs are getting a little tough to one shot), keep the exact same setup and rinse and repeat for dungeons 2, 3, and so on
  • Proceed to phase 3 when you’ve reached the same checkpoint across all the dungeons you have prepped

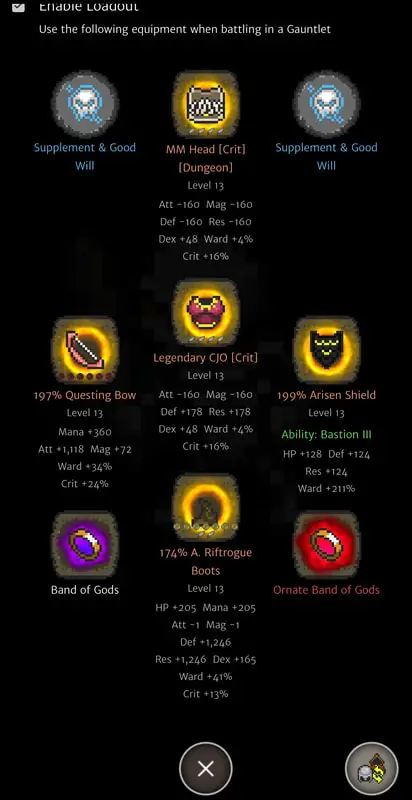
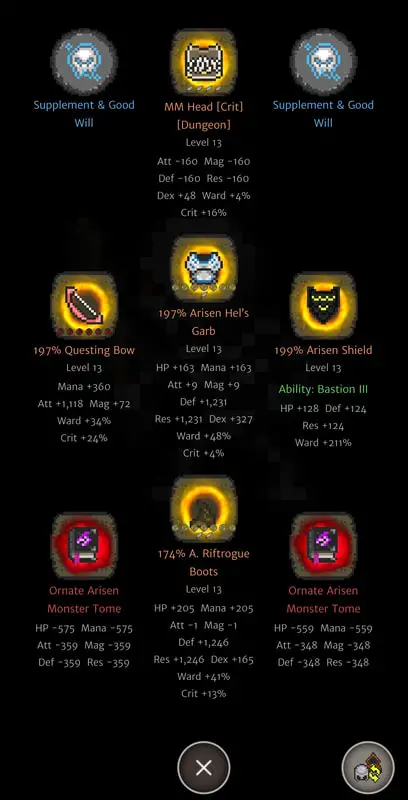
​Phase 3: Floors 100 onwards

To me, this is where the fun really starts as you’ll need to pay attention. From personal experience, I’d say Phase 2 is doable while watching TV whereas Phase 3 can quickly end your run if you get slightly distracted.

In terms of your build, there are a few notable changes:
  • You will move out of Oracle and into Assassin for the guaranteed sleep dart as well as the def down procs
  • You will swap out of Accessory Effectiveness amity into Crit Effectiveness amity to make sure one shots stay that way
  • You’ll use the appropriate shrine and try to finish 3-4 dungeons before the shrine runs out

Here, what to do becomes an action priority rather than an action sequence. This means you’re running a mental checklist of what’s going on rather than slamming a fixed set of actions brainlessly. This is also why the slightest distraction can get you killed. Stay focused!

Action priority:
  • Is mob sleep immune? If no, sleep dart
    • Once sleep dart is applied, think of this as a pit stop where you can take as long as you need to recover
    • Important: death occurs between pit stops, not at pit stops, so do what you need to as long as you need to while the sleep dart is applied.
    • Task 1: check ward. If you need to recover ward, use 1 turn skills like Ward of Mythril. Do not use Divine Bastion 2 because the mob could wake up in the middle of your cast and kill you.
    • Task 2: check mana. If you need mana, drink a pot.
    • Task 3: check Bloodshift. If you need it, cast it.
    • Task 4: check DC. If you need it, spam Ward of Mythril to wait for DC to cast. If DC casts and Bloodshift falls off, hopefully this is obvious, cast Bloodshift.
    • Task 5: can you one shot the mob that is asleep? If not, cast exploit.
    • Task 6: check HP, are you above redline? If so spam Ward of Mythril or Bastion to let your own zerk bring you back down to redline.
  • Is the mob sleep immune? Yes. This is where the fun starts because bosses and some nasty zerk monsters are sleep immune. However, killing these are also where the juicy rewards lie so let’s charge ahead!
    • Can I kill with Guarding Strikes III? If yes that’s the best because it’ll never crit and you’ll stay in redline.
    • Do I have elemental advantage with an elemental strike III? If yes, that’s second best because while you’ll crit, you’ll also likely kill it in one shot and live another day.
    • Is it resistant to Dragon damage? If no, go ahead and Basic Attack. If yes, you have two choices here:
      • Keep your current weapon: Forbid (if it’s a melee mob), Stun (just in case it has Mystic Feather), maybe Exploit, and then try to kill it with Dragon damage.
      • Change your main hand. Bring a beefy 2 hander with neutral enchantment (i.e. physical damage) and blast it away and live another day.
    • Is it immune to Dragon damage? If no, see above. If yes, you have two choices here:
      • Change your main hand to a beefy 2 hander with physical damage (as above)
      • Use another elemental strike III even if you don’t have elemental advantage as long as you believe it can still penetrate
    • Is the mob Nidhogg? If yes:
      • Congratulations, you may rest. Nidhogg is the ultimate pit stop floor as it can only deal dragon damage, which you are immune to. Nidhogg is where you can do longer things such as Divine Bastion to fully recover ward.

​Final words

​As you can see, Phase 3 is where decision-making occurs. Specifically, it’s what you need to do on floors that are sleep immune as they pose an immediate danger to you. As you get more and more practice underneath your belt, you’ll come to see floors that are NOT sleep immune as safe harbor checkpoints and feel your blood pressure rise on floors that are sleep immune.
​

Video Guides

Check this playlist for a full end-to-end guide that covers all of the above: ​www.youtube.com/playlist?list=PLmfIIT-0syBGvdT98MFA7dNu6huQbmm7R
​
Couple of vids below to start you off on that series, and then another two below for exp runs:
2 Comments
Gumbalooo
24/2/2023 11:11:16

Step 1:

Obtain half of the items/gear/amities and an ornate band of gods before you start this guide!

Reply
gui
12/3/2023 14:44:27

can you tell which adornments where used in both weapons and armor? I still can't identify the by the icon itself, thanks

Reply


Leave a Reply.

    Picture


    ​Discord 

    Picture

    Author

    Shabbash has been playing Orna since the summer of 2019, reaching max level 250 a year later, and has a vast plethora of experience within the game. After completing and surviving the grind, Shabbash now turns his attention to creating the best guide resources for players to improve their enjoyment of what Orna has to offer.

    Become a Patron!

    Categories

    All
    Aethric
    Beginner
    Build
    Deity
    Endgame
    Endless
    Events
    General
    Gilgamesh
    Guide
    Heretic
    Mage
    PvP
    Realmshifter
    Review
    Social
    Summoner
    Swash
    Thief
    Warrior

    Picture

    Orna Events

    Next event:
    Orna Champions III
    Live PvP Tournament
    Win the "Fallen Champion" in-game title! Begins 13th March 2023

    RSS Feed

Home

Guides

Builds

Codex

Podcast

Contact

Picture
Picture
Picture
  • Home
  • Guides
  • Builds
  • Aethric
    • Aethric Map
  • Amities
  • More
    • Codex >
      • Tier 1
      • Tier 2
      • Tier 3
      • Tier 4
      • Tier 5
      • Tier 6
      • Tier 7
      • Tier 8
      • Tier 9
      • Tier 10
    • Podcast