strategy - Builds - Guides
Dominate your world
Introduction Welcome to tier 10 and welcome to Realmshifter! Realmshifter is a class that specializes in speed. Fast dungeons, fast PvP, and (after setting up) fast raids. This guide will take you through everything you need to get started as Realmshifter; general gameplay, essential skills, pets, starter gear, and the spec that’ll be your best friend until at least level 235. By the end of this guide you’ll be confidently completing dungeons, smashing through PvP, and taking on The Morrigan. Passive abilities breakdownResurgence states that “You will become more powerful as your HP decreases in battle.” This means starting at 50% HP, all your stats (attack, defenses, dex for dodging, etc.) will start increasing for a maximum of a 2X gain when your health reaches 1%. When you see the term “redline” mentioned, they are talking about this effect where a Realm is strongest at that last sliver of HP. With resurgence maximizing stats at 1HP, this means ward is a Realm’s new effective health. To repeat, HP keeps you alive up until Tier 9, whereas ward keeps you alive starting at T10 as a Realm. High Tenacity says “damage taken from some self-inflicted status effects will not fully deplete your HP.” Practically, this means berserk (triggered by skill, pet like chimera, or via consumables like mushroom) cannot kill you when you are at 1HP. As berserk is a main source of damage buffs (and defense too in the case of berserk 2 and berserk 3), high tenacity works seamlessly with resurgence above like peanut butter and jelly: you can stay at 1HP without killing yourself from your own damage boosting buffs. This does not cover other damage over time afflictions such as bleed, toxic, curse, burn, etc. and those will still pierce the ward and kill you easily at 1 HP. Mystic Feather says “your chance to dodge attacks increases as damage is taken.” This means your dodge rate is the highest it can be when you’re sitting at 1HP and is a key part of a Realm’s defenses in raids. Summary of core Realm mechanics
You may have noticed that Recharge II was missing from the above. You might have fond memories of using Recharge back as an Arcanic, but with Realmshifter’s trifecta of power being centered around staying at 1 HP gaining it back on a crit actually ends up being a very bad thing. Recharge II can heal up to 50% of your health, which means if you were at 1HP for full Resurgence it’s taking away the entire 50% stat boost and most of your mystic feather protection. So if you were raiding you’re not only doing less damage, you’re getting hit more and taking a lot more damage when you do get hit. At level 235 you’ll unlock the skill Bloodshift and critting will be a different story, but that’s outside of the scope of this guide. Realm’s Light and Saboteur II are nice convenient passives that you get to enjoy, but you don’t need to worry about anything special with either of them. You have extra VD and sometimes you lower opponent defenses for free. What’s not to like? SpecializationsTl;dr Just go Charmer. Here’s why: Charmer: Realm as a fresh T10 is like a baby eagle trying to fly: there’s so much potential but you just don’t have the gear or the knowledge. We firmly believe Charmer is the most approachable, least painful specialization for a Realm at T10 so you can soar like the rest of your Realm buddies ASAP. A few strong selling points of Charmer:
This guide will focus on Charmer, but if you want to forge your own path these are the other specs than can be viable: Raider: Raider’s skill of Berserk III can let you easily get into redline while boosting your damage. The downside of this is that you’re left using the incredibly mana intensive Swordplay III skill, which even while under the effects of Berserk III still does comparable damage to Warrior’s Pavane. And on top of that the 20% HP reduction from this spec reduces your survivability. Assassin: Assassin’s random chances to proc T. Def ↓↓↓ and the additional mana from using potions are both very useful, however Assassin, like raider, is held back by needing to use Swordplay III. Mana is a huge issue for early Realmshifters. Zwei-fencer: Zwei-fencer is fairly tanky and gives you access to Sweep; one of the few melee AoE skills. Unfortunately, especially early on, Zwei-fencer’s overall damage output is quite low and without powerful gear Sweep won’t be sweeping away any dungeon floors beyond Goblin Fortresses or Mystic Caves. Good two-handed thief weapons are also far and few between, so you likely won’t be able to take advantage of the 15% passive stat boost. Cataphract: There isn’t much to say about Cataphract. It’s the most defensive and survivable of all the Realmshifter specs, but that survivability comes at the cost of having low damage output compared to any other viable spec. Ranger: Arrowstorm II is the reason to go Ranger, as it’s both a viable AoE spell and reasonable single-target attack. Unfortunately it has very low penetration so the damage can fall off heavily in raids, PvP, or even just against tankier dungeon enemies. Swashbuckler: Swashbuckler is immensely complicated and plays differently than any other spec with Realmshifter. It is very, very bad at raiding early on but is very capable for dungeons and excels at PvP. Fully diving into Swashbuckler is beyond the scope of this article as it nearly may as well be a class of its own. Skills & Pets Like all T10 classes, playing Realmshifter effectively requires buying more classes than just Realmshifter. Right away you’ll want to pick up the following: Atlas Vanguard
And you’re not done spending your Orns yet, you’ll also need to pick up a couple of pets: Chimera and Orichalcum Golem (yes, the tier 7 golem). There are many useful event pets as well but since those are seasonal we’ve put them into a later section. Later on at level 230 you’ll also want to pick up: Beowulf
Content Type 1: Raiding Your main objective as a fresh T10 Realm is to do at least 3-5 million of damage to Apollyon and Morrigan comfortably in a single run. This benchmark sets you up for long-term success because if you’re able to do this, you’re also able to clear most World Raid Bosses with the same setup or minimal modifications. As an example of an effective raid build that you can probably build shortly after reaching tier 10, we designed this loadout. Your Fey Yeti Coat probably shouldn’t be broken, but it’s what Knight had on hand:  Realm start guide Raiding gear 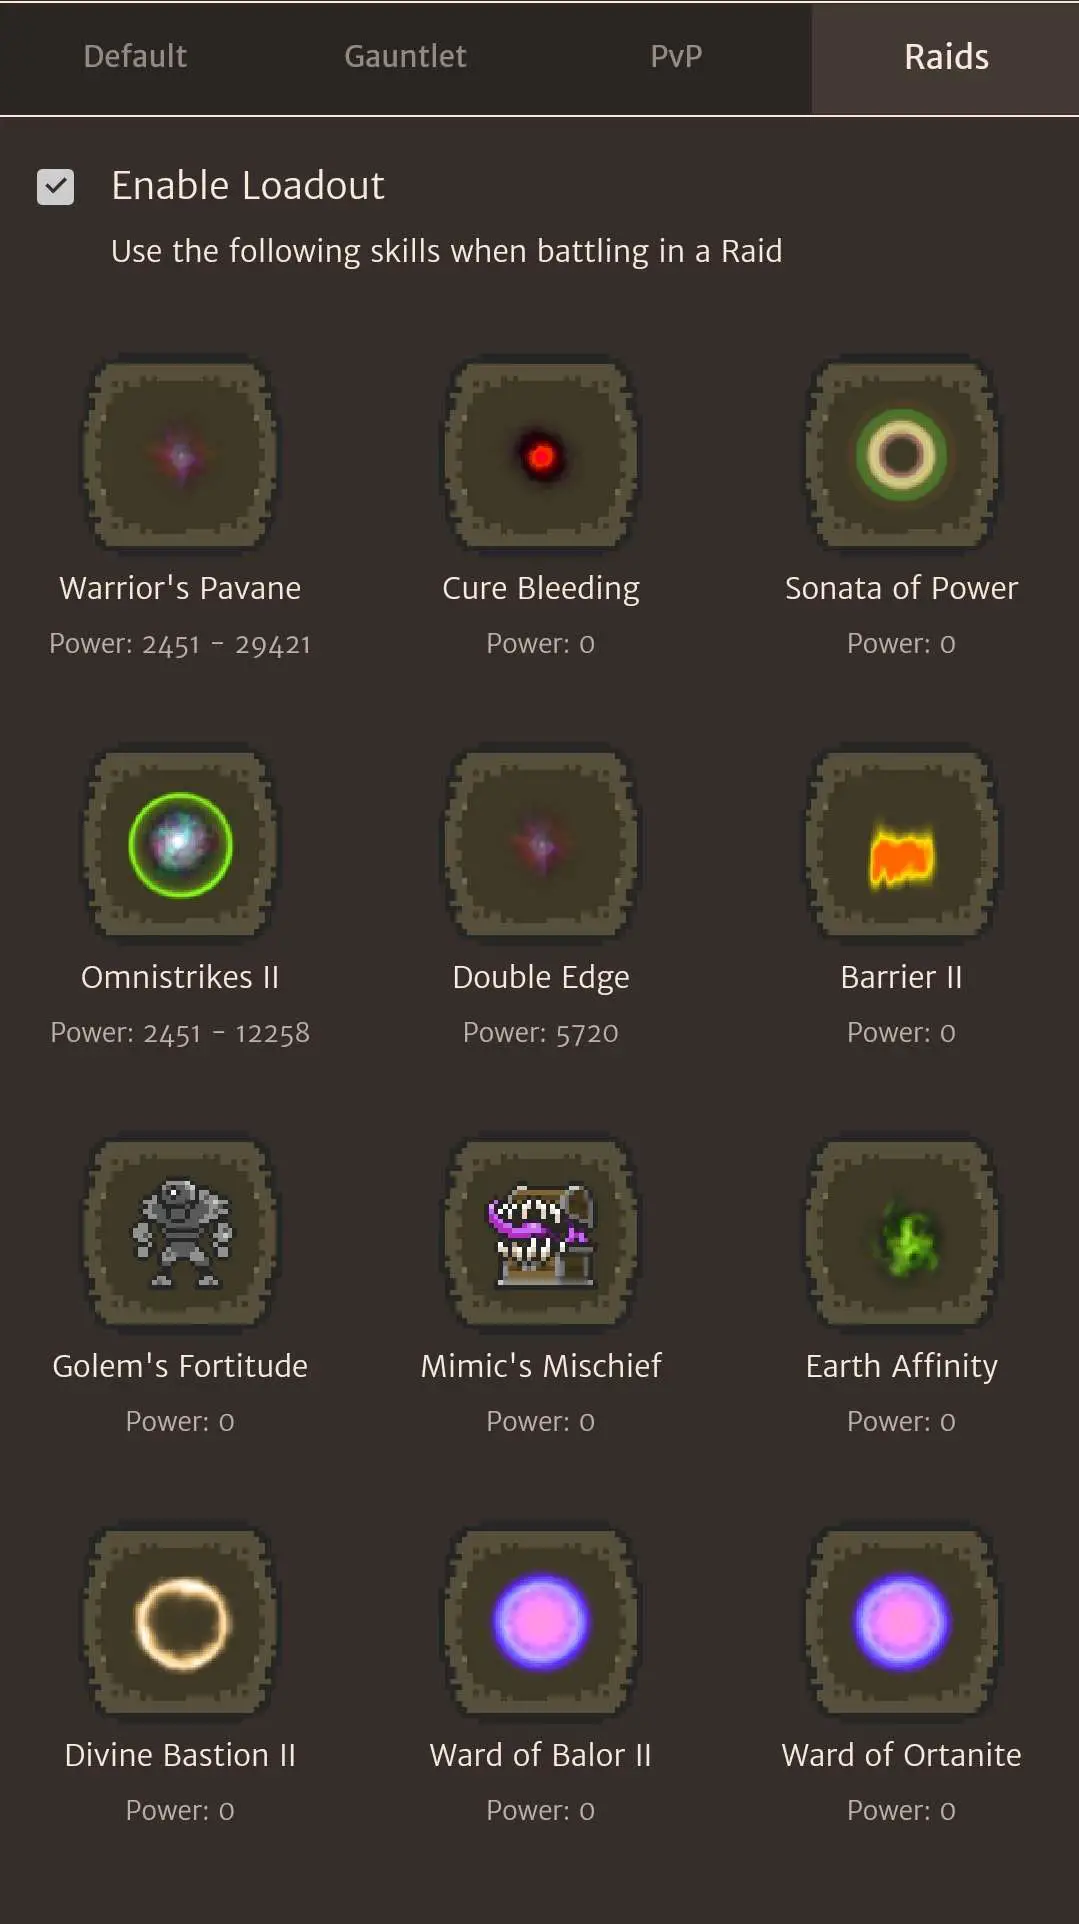 Realm start guide Raiding skills Gear ChoicesYour goal is to get to 30K ward as a benchmark. With 30K ward, you can do decent damage to Apollyon and Morrigan. This gear is reasonably easy to obtain as a fresh T10 as nothing is locked behind events or the very raid you’re trying to kill. Old Nothren Crown is a quest item, a standard quality Fey Yeti Coat is doable via WRB even if you only have a few scrolls, boots are irrelevant in this setup, shield can be high roll Mighty Griffin (T9) or Fallen Shield (T9) or even a Heimdal’s (T8), and weapon is a Bident (T10) from dungeons or Ithra’s Blade (T9). For weapon adornment, we strongly suggest you use Assassin Jewels for all your slots. Not only is it a huge DPS boost in causing temp defense downs on the raid boss, the debuff on boss also triggers bosses like Morrigan to use cleanse which means a skipped turn on doing damage to you (similar to lull mechanic from Charmer spec). To an extent more Assassin Jewels have diminishing returns, however nothing else you can adorn your weapons with at this stage will be better. For armor adornment, we strongly suggest you use the strongest ward adornments you have, as breaking that 30K ward benchmark will be your top goal. For your pet we strongly suggest you use Chimera as it provides a free berserk buff that helps you get into resurgence range. You can mess with other options after you’re comfortable with Chimera so check out the “Pet” section later for alternatives. If you don’t mind spending berserk mushrooms from the Arena or using Double Edge to get your HP down then Orichalcum Golem can make raiding more relaxed and safe by keeping up your ward turns. Example action sequence >>> SETUP PHASE <<<
To DC or not to DC Deific Channel is a popular skill to boost damage as it doubles your output at a cost of taking 3 turns. Here we have 2 different points of view on DC and a verdict. At the end of the day, try to decide for yourself. The case for DC (Signet’s POV): it’s a nice 2X to your damage and you can pop out some nice numbers if DC is up, you’re at 1HP with berserks, and also def down(s) are on the boss from Assassin Jewels. The big numbers provide psychological benefits to keep grinding. It’s also a nice defense boost as you take very little damage (relatively) when DC is up. You’d add DC into your rotation by casting DC (3 turns), and then spamming Pavane until DC falls off, and then casting DC again. The case against DC (Knight’s POV): manually casting DC is a waste of time. It doubles your damage for at least 2 turns, but you spend 3 turns to cast it and most commonly it’ll go away 3 turns after you cast it. That means you just spent 3 turns for the sake of seeing some big numbers that’ll most commonly even out to the same average damage. If you have to do anything else like cure bleeding, restore mana, or restore ward during the turns DC is up you’re further wasting the turns you spent to get DC in the first place. The verdict: we both agreed DC is worth it if lasted longer than the 3 turns it takes to cast. So in cases where you have an amity that increases buff duration by 40%, 50%, etc. then it’s a no brainer. DC will likely last 5-10 turns at the cost of 3 so you’re definitely “in the money.” Without the amity it’s likely not worth it. Raids to focus on early in your Realm life
Video Example of basic Realmshifter/Charmer vs The Morrigan: Video Example of more advanced Realmshifter/Charmer vs. Arisen Morrigan with 1400 attack weapon: Content Type 2: Solo Dungeons Solo dungeons are one of the only pieces of content that doesn’t change all that much once you reach tier 10. Everyone has their favorite ways of running them and there’s a lot of room for customizing to fit how you want to play, so don’t worry too much about deviating from this guide once you understand the enemies and challenges in a T10 dungeon. Things to keep in mind:
Reference loadouts for Charmer dungeons: 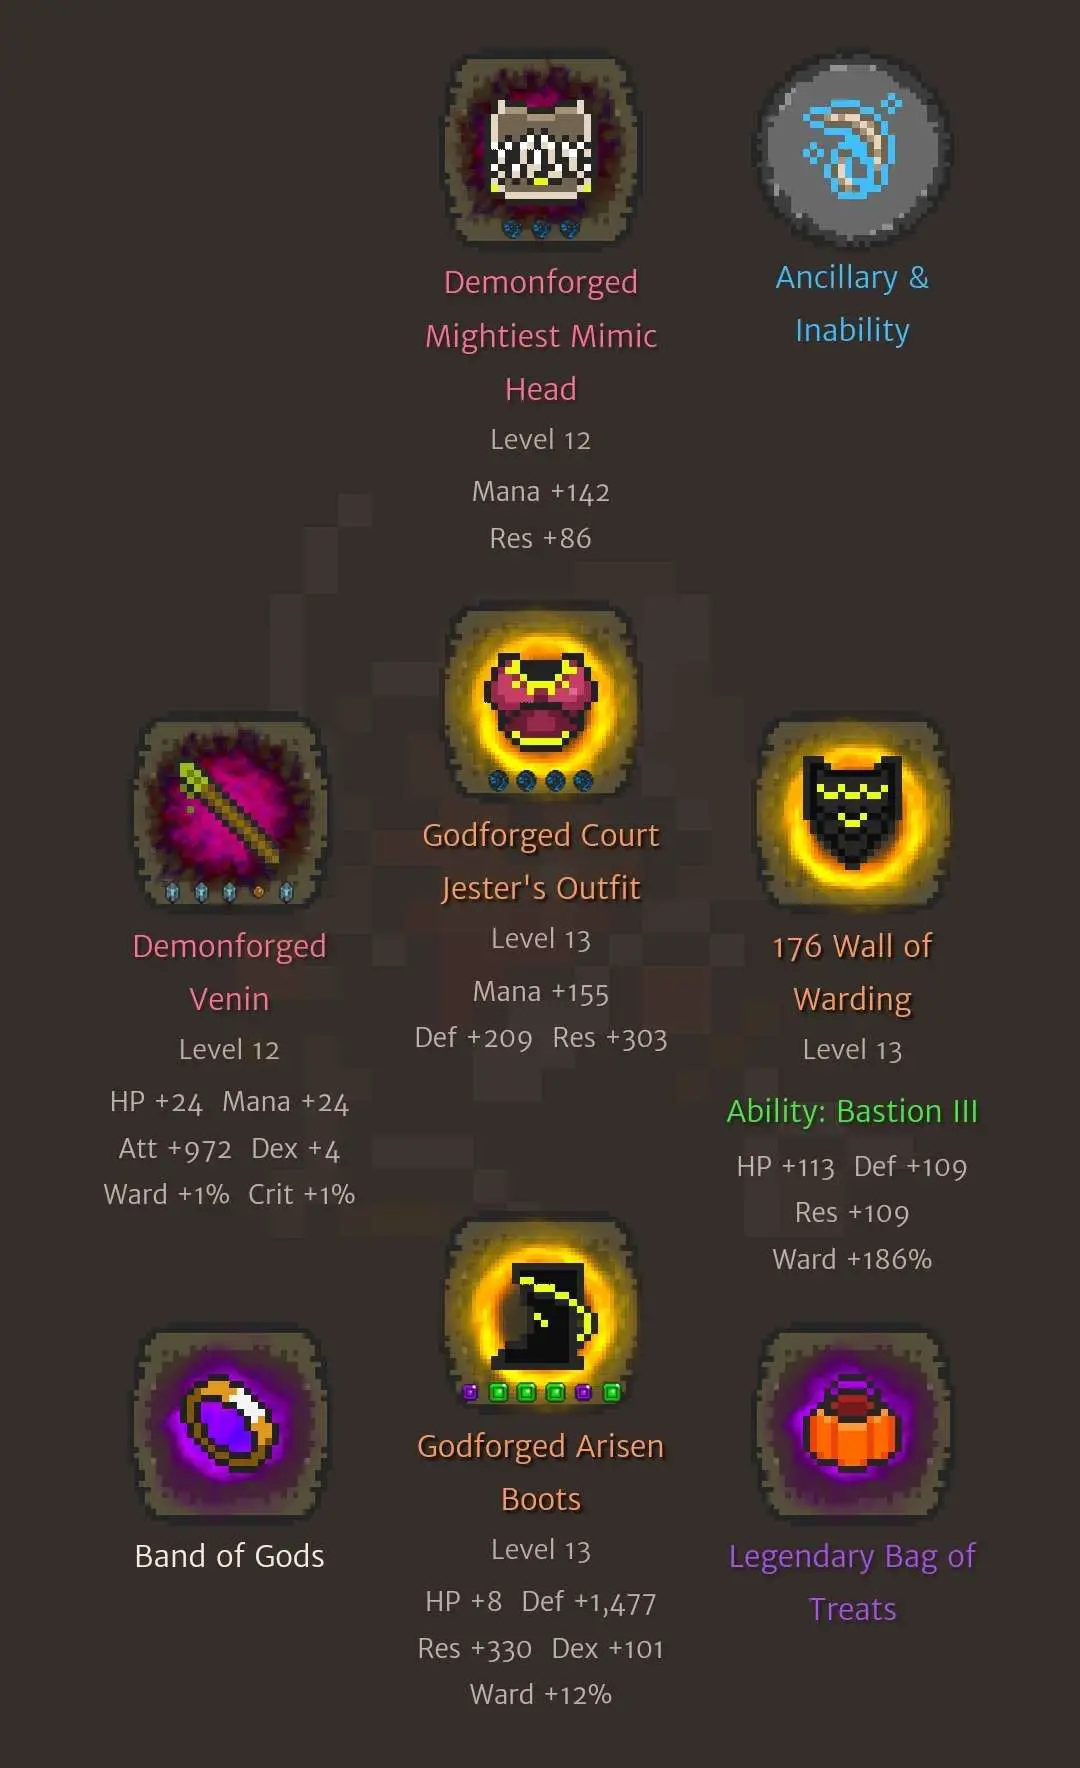 Realm start guide Dungeon gear 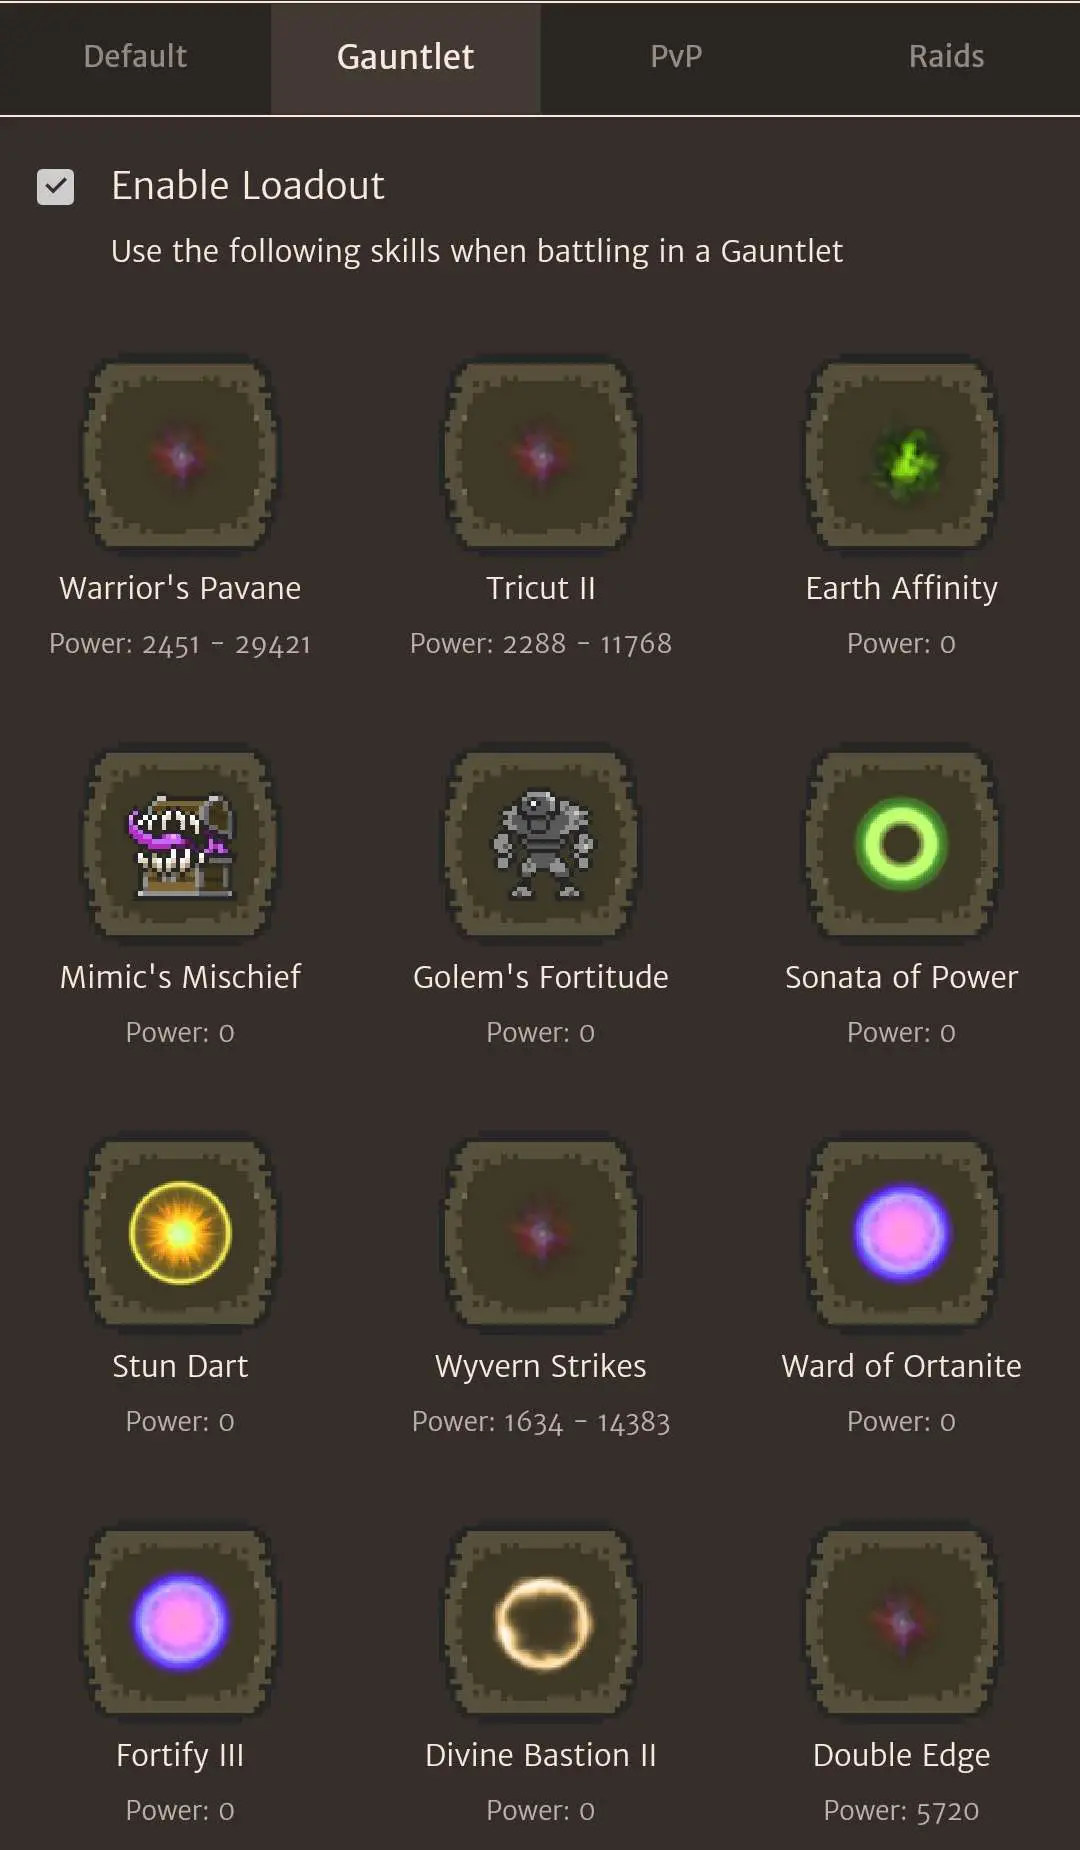 Realm start guide Dungeon skills Example action sequence:
Starter gear explanation:
Gear upgrades:
Content Type 3: Horde Dungeons Option 1: Realmshifter / Zweifencer (we suggest option 2) The best setup for melee AoE that currently exists in the game is probably the Zweifencer specialization thanks to the skill “sweep.” However, as this guide is geared towards fresh T10 Realms, our strong recommendation is that you just use the caster route outlined below for horde dungeons and party play for the following reasons:
Option 2: Changing to Deity or Heretic and using Mage Pavane Keeping in mind class swaps are free in Orna whereas spec swaps cost Orns, the Charmer spec gives you a free way to do Horde Dungeons simply by switching to either Deity or Heretic. We’ll use Deity as an example here but either class works and you can work out which one you’re more comfortable with. For skills: Mage’s Pavane from the Charmer spec is your best friend as a true AoE skill and an absurdly mana efficient cost of 60 mana. For single targets we recommend Faction Seal skills as they do decent damage and add ward turns. Otherwise, Drain or Transference can easily burn down any left over from the carnage of Mage’s Pavane. For gear: you can literally use the same gear you have for Realm (which is super helpful for early T10 due to shortage of ward adorns, etc.) and equip those on a Deity. The only thing that needs to change is the weapon, swapping out something that does attack to something that does magic. Any high roll magic weapon here works, e.g. Horror, Terror, Demeter’s Staff, Ithra’s Staff, etc. As long as your weapon has 1000+ magic damage, you’re good to go! Action sequence: same as raid where you’re buffing Ward of Ortanite followed by Golem’s / Barrier II. Then Sonata (looking for Mag up this time) and if that fails Mimic’s. Pop a panacea if you get cursed, spam a few Bastion/Fortify to add some ward turns, and let your Mage’s Pavane loose, baby! 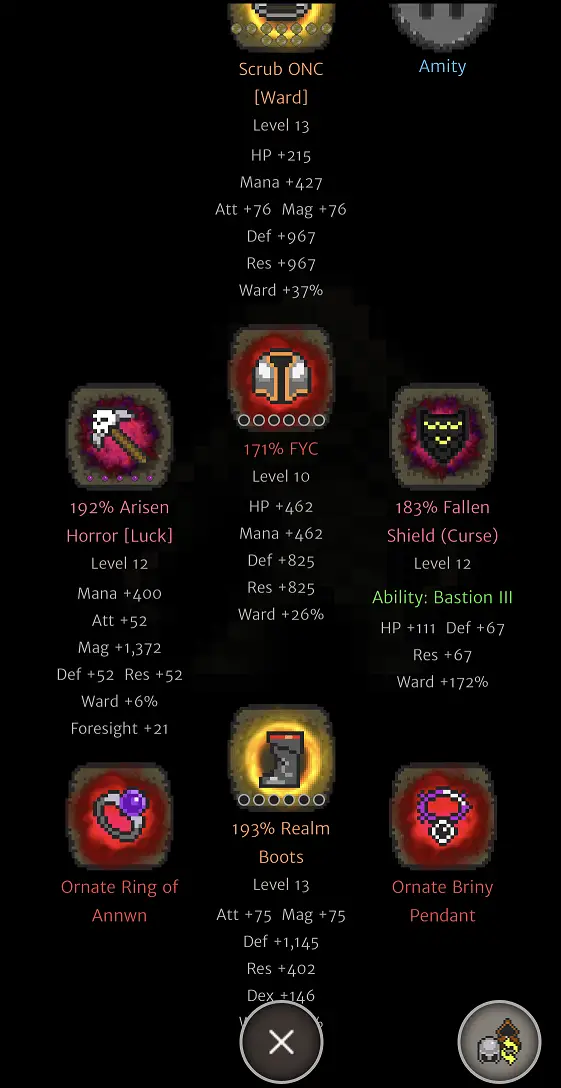 Realm start guide Horde Mage Pavane gear  Realm start guide Horde Mage Pavane skills Video Example of Mage Pavane horde dungeons: Content Type 4: PvP Fast PvP is Realmshifter’s specialty, and it’s going to be the one place using crit can be a good idea. For Realmshifter PvP your singular important tactic is killing the opponent before they kill you. That’s not to say Realmshifter can’t be defensive or strategic; it can. But that’s not how you should play Realmshifter to start off if your main goals are to grind through the arena, win kingdom war battles, and take over territory. For skills, Realmshifter has a few different options:
Gearing:
Sequence:
Territory & Kingdom war defense Good luck! Realmshifter is quite bad at these, especially early on. Your best bet will be to minimize the AI’s ability to do something silly, and only have 1 or 2 skills equipped. This helps to ensure that your AI tries to kill the opponent as fast as possible instead of wasting turns buffing your ward or something. Content Type 5: Endless The fifth and final major content you’ll encounter in Orna is Endless Dungeons. As this guide is primarily for fresh Realmshifters who just hit T10, we consider Endless to be out of scope of this article. Realm/Charmer is a great spec for endless, and hopefully we’ll discuss this a bit more in a future piece of content. Meanwhile check out this guide to see the potential: Deep Dive: Realmshifter Equipment and GearingHead: Old Nothren Crown (ONC). Find the NPC “Borr” in the world (pro tip: use Discord to access him via someone else’s Wayvessel) and finish his quest. You’ll get a normal 100% quality one which is absolutely good enough to take it all the way to Demonforge / Godforge. Every end game Realm has at least one Godforged 100% ONC in their stash. The important things about this headgear are 1) the built-in immunity against Attack Down (single and double) which allows you to use Golem’s Fortitude for defensive buffs without worrying about curing Attack Downs, 2) the sheer number of slots that you can jam ward adornments into as a fresh Realm, and 3) how easy it is to get as a fresh T10. Chest: Fey Yeti Coat (FYC). This is probably the easiest chestpiece you can obtain (starting in T9 no less!) that will add a substantial amount of ward. Higher % is better, but anything Famed or better is OK to take all the way to Demonforge and it’ll last you quite a while. If you’re lucky you’ll come across a high roll Realm Garb (from Apollyon Kingdom Raid) or a high roll Ashen Phoecian Garb (from Ashen Phoenix WRB), which are both great. There are also event-locked chest pieces which we didn’t mention here to make the guide applicable year round. Boots: this slot is the hardest to gear by far as a T10; don’t worry you’re not the only one! The game just doesn’t give Realms a pair of boots that has ward on it easily, so keep grinding and eventually a good pair will drop for you. Boots available year round are Realm Boots (Apollyon) and Ashen Phoenician Boots (Ashen Phoenix). Keep in mind for the basic raid setup of 30K ward, you don’t need ward innately from boots in order to meet the ward threshold, so any pair that has decent defenses with a few slots for ward adornments will suffice for now. Weapon: generally speaking attack is the single most important stat you’re looking for in weapons with very few exceptions. This means you should prioritize attack above dex, mana, etc. for the foreseeable future. Deviate away from this once you “graduate” from this guide and know what you’re doing.
Offhand: ward is the single biggest stat to look for in your off hand. Something 160% or greater is sufficient for entry level T10 raiding. Examples of decent shields are Heimdal’s (stun protect too), Mighty Griffin Shield (dragon protection), and Fallen Shield, eventually with the Arisen Shield being best in slot in terms of ward. Accessories: strongly recommend you start with Briny and Annwn. You can deviate away from these two when you know what you’re doing. Amity: for offense, buff uptime and crit effectiveness (for later); for quality of life, mana regen, ward regen, accessory effectiveness; for PvP definitely pick up 80% resistance to any element to counter Ultima. To hunt for specific amities you want make sure to check out the Amity Hunter channel within the Orna Legends discord. Event Checklist Events are a big part of Orna gameplay with some event-specific items (labeled as “exotic” in-game) making or breaking a build. Good news is we wrote this guide without a reliance on any event specific gear, but we also wanted to give you this list to set you up for future success as a Realmshifter. New events are added all the time, so this list might not be exhaustive!
Phoenix
Arisen Hel
0 Comments
Leave a Reply. |
AuthorShabbash has been playing Orna since the summer of 2019, reaching max level 250 a year later, and has a vast plethora of experience within the game. After completing and surviving the grind, Shabbash now turns his attention to creating the best guide resources for players to improve their enjoyment of what Orna has to offer. Categories
All

Orna EventsNext event:
Orna Champions III Live PvP Tournament Win the "Fallen Champion" in-game title! Begins 13th March 2023 |

 RSS Feed


